Grindal worms are an excellent 2nd stage food for when the fry are a bit larger (>1cm) and is not that difficult to culture, if a few basics are followed.
To culture grindal worms you will need a very well ventilated container (the larger the surface area the better as it is more environmentally stable). I still use plastic containers, but rather than the small clear ones I use for microworms, I like to use 2-4 litre opaque containers. I make holes (soldering iron again) in the lid and 2 rows on all the sides (1st row near the top, and 2nd row about 1/3 from the base). These 2 rows on the sides allow the air to circulate. which is important, even if the containers are stacked. Keeping the worms in the dark (another plus for a good culture) is the reason for the opaque containers.
The "bedding" for the worms can be a normal compost but it must be alkaline so avoid those with a high concentration of peat. Personally, I like to use boiled coir compost (as I already have this available for my Nothos), but I still add some gardening lime to make sure that when in use it will not become acidic. If this happens then the culture will start to spell terrible, the worms will all try to climb out and the culture dies very quickly. Only about 5cm (2ins) of damp compost (if squeezed the compost stays as a lump, but no excess water comes out) is required, hence the importance of surface area rather than volume in choosing the container.
I make a depression on the top of the compost, and this is where I add my starter culture (from another culture or a friend), next I feed a coating of Ready Brek (my preference, but there are many alternatives as you can see on YouTube) but only in the depression. Next damp down the food with some fresh water (using a plant misting sprayer is ideal), as the worms do not like dry cereal, but do not over wet the compost. If the compost becomes too wet then elevate one end of the container, dig out a lower corner of the compost and use a paper towel to absorb the excess water. Try to feed only enough for the worms to eat in 1 day, which will stop the food from going mouldy (if this happens then the food needs to be removed). As the number of worms multiply then the depression can be enlarged, if required.
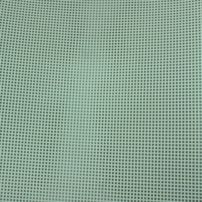
Once there are plenty of worms visible, then the next step is to start harvesting. Place a piece of hard plastic over the depression and the worms will congregate on this. I like to use a plastic mesh (see picture), that is used for reinforcing bags. Thus making it very easy to remove the plastic and wash off the worms into a container, from which they can be fed to your fish with a pipette.
Someone has suggested that I could use dried dog (or cat) pellets and it is much easier than using Ready Brek, so I will try this out and let you know which one I prefer. Of course I will use cat pellets as I do not have a dog. Must say that I tried using cat pellets (GoCat) but found that these were not very successful and the number of worms I could collect dropped off considerably, so went back to using Ready Brek.
Must say that in November/December 2018 I did not follow my own advice and used some general garden compost that I had left over after planting my winter flowers. I added some garden lime as usual but the worms were not happy and actually disappeared over a week or so, so I am now back to using coir with good results.
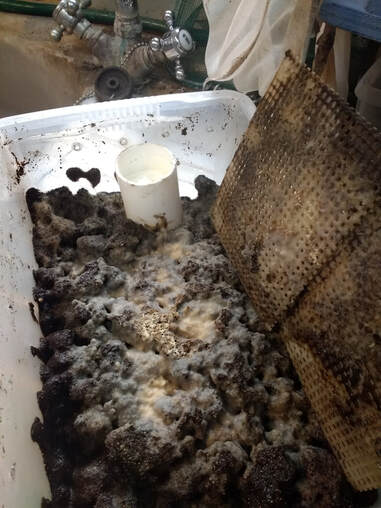
Now into 2020, and I have added small vertical plastic tube to my boxes (see photo below), inside which I place a rolled up paper towel, which wicks up the excess moisture and are replaced on a regular basis. Somebody had mentioned this idea on one of the Facebook groups, but unfortunately I cannot remember who this was, but I would like to say a big thank-you as it has improved my cultures a lot. I now get a lot more worms and the cultures are staying fresh and lasting a lot longer.
To culture grindal worms you will need a very well ventilated container (the larger the surface area the better as it is more environmentally stable). I still use plastic containers, but rather than the small clear ones I use for microworms, I like to use 2-4 litre opaque containers. I make holes (soldering iron again) in the lid and 2 rows on all the sides (1st row near the top, and 2nd row about 1/3 from the base). These 2 rows on the sides allow the air to circulate. which is important, even if the containers are stacked. Keeping the worms in the dark (another plus for a good culture) is the reason for the opaque containers.
The "bedding" for the worms can be a normal compost but it must be alkaline so avoid those with a high concentration of peat. Personally, I like to use boiled coir compost (as I already have this available for my Nothos), but I still add some gardening lime to make sure that when in use it will not become acidic. If this happens then the culture will start to spell terrible, the worms will all try to climb out and the culture dies very quickly. Only about 5cm (2ins) of damp compost (if squeezed the compost stays as a lump, but no excess water comes out) is required, hence the importance of surface area rather than volume in choosing the container.
I make a depression on the top of the compost, and this is where I add my starter culture (from another culture or a friend), next I feed a coating of Ready Brek (my preference, but there are many alternatives as you can see on YouTube) but only in the depression. Next damp down the food with some fresh water (using a plant misting sprayer is ideal), as the worms do not like dry cereal, but do not over wet the compost. If the compost becomes too wet then elevate one end of the container, dig out a lower corner of the compost and use a paper towel to absorb the excess water. Try to feed only enough for the worms to eat in 1 day, which will stop the food from going mouldy (if this happens then the food needs to be removed). As the number of worms multiply then the depression can be enlarged, if required.
Once there are plenty of worms visible, then the next step is to start harvesting. Place a piece of hard plastic over the depression and the worms will congregate on this. I like to use a plastic mesh (see picture), that is used for reinforcing bags. Thus making it very easy to remove the plastic and wash off the worms into a container, from which they can be fed to your fish with a pipette.
Someone has suggested that I could use dried dog (or cat) pellets and it is much easier than using Ready Brek, so I will try this out and let you know which one I prefer. Of course I will use cat pellets as I do not have a dog. Must say that I tried using cat pellets (GoCat) but found that these were not very successful and the number of worms I could collect dropped off considerably, so went back to using Ready Brek.
Must say that in November/December 2018 I did not follow my own advice and used some general garden compost that I had left over after planting my winter flowers. I added some garden lime as usual but the worms were not happy and actually disappeared over a week or so, so I am now back to using coir with good results.
Now into 2020, and I have added small vertical plastic tube to my boxes (see photo below), inside which I place a rolled up paper towel, which wicks up the excess moisture and are replaced on a regular basis. Somebody had mentioned this idea on one of the Facebook groups, but unfortunately I cannot remember who this was, but I would like to say a big thank-you as it has improved my cultures a lot. I now get a lot more worms and the cultures are staying fresh and lasting a lot longer.